An SSD is the best upgrade for any computer due to its fast access times.
But that also means the applications stored on a slower HDD will open slowly as before.
Storing the frequently used files to an SSD will result in the same snappiness with a slow-moving HDD.
So, tag along as I set up an SSD cache.
What is SSD Caching?
SSD caching refers to storing files temporarily on a fast solid-state drive which normally resides on a hard drive.
SSD caching helps you when you have many files on a hard drive.
Normally opening it will take a long time.
But how does the caching work?
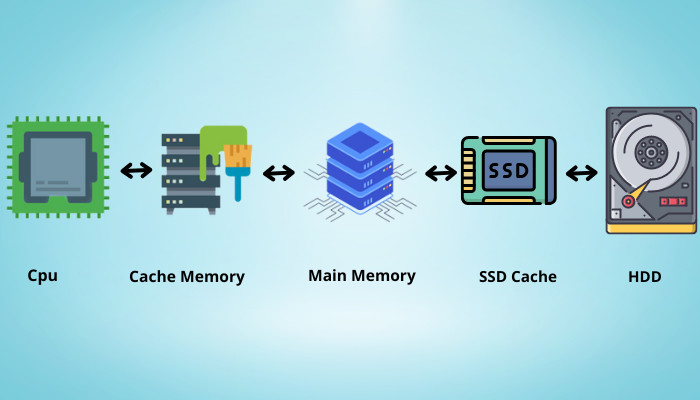
When a program needs data, it first looks at the RAM to see if it has loaded it.
The next stop is at the disk drive where the utility is installed.
For hard drives, the access time is extremely slow.
This has everything to do with how they are designed to store data.
A lever seeks the mechanical disk drive until the data is found.
As you could expect, this process is extremely slow.
In the case of an SSD, the files are accessed at a much higher rate than HDDs.
This is due to the presence of flash-based storage.
This diagram perfectly shows how an SSD cache positions itself when a data request is made.

Are you wondering if you canrepurpose an old laptops hard drive?
Read our fantastic piece that explains how to do so.
For Intel processors, you have Smart Response Technology (SRT) and Intel Optane.
Similarly, the AMD processors use the Store MI app to set the aforementioned cache.
But the big issue prevalent on both these platforms is the support for the app.
Just because you have an Intel processor does not guarantee you might use the SRT app.

Only a handful of processors, along with motherboard chipsets, guarantee this.
So, lets start setting up the SSD cache.
For Intel Systems
There are two ways of enabling an SSD cache on your Intel system.
First, use Intels Smart Response Technology app with your existing flash-based drive.
Secondly, purchase an Intel Optane SSD and use its proprietary software.
We will evaluate whether it is worth using it in a later section.
We will go through both ways of enabling SSD cache with Intel systems.
For the SRT app, an Intel second-generation processor or newer is required.
And, when using Intel Optane, you must have an Intel 7th processor or newer.
For both cases, the underlying approach is similar.
Take a look at a detailed recommended specification from Intels website below.
Before setting up the SSD cache, you must set theSATA ConfigurationasRAIDfrom the BIOS.
To do this, enter the BIOS by pressing theDELkey.
Next, go toAdvanced>Integrated Peripherals>SATA Mode>RAID.
Once this is done, lets set up the SSD cache for an SSD different from Intel Optane.
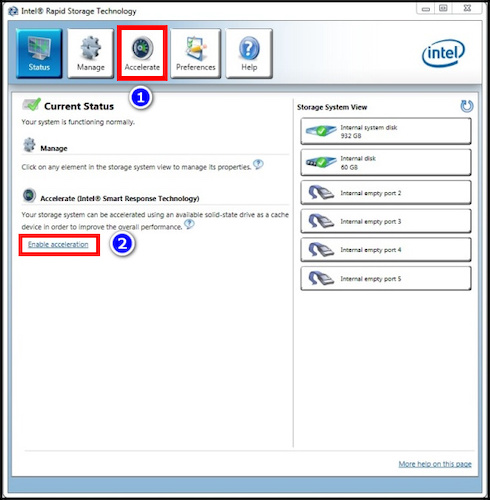
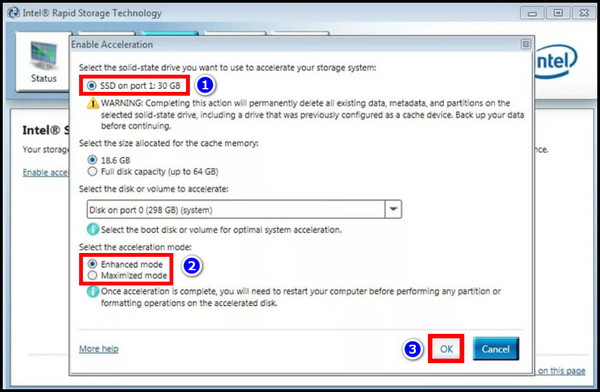
Here are the steps to enable SSD cache with Intel Smart Response Technology:
Now, reboot your gear.
The app will load all your frequently used files and apps on to the SSD.
Once the caching is done, the applications will start to speed up.

Also, check out our separate post on how toaccess files on SSD.
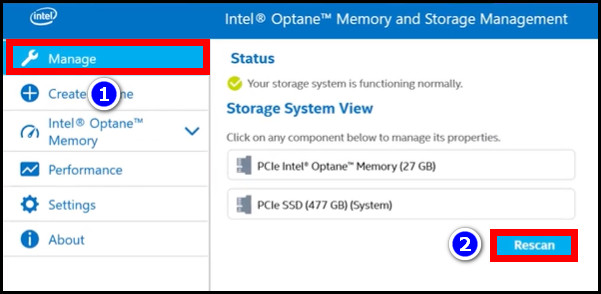
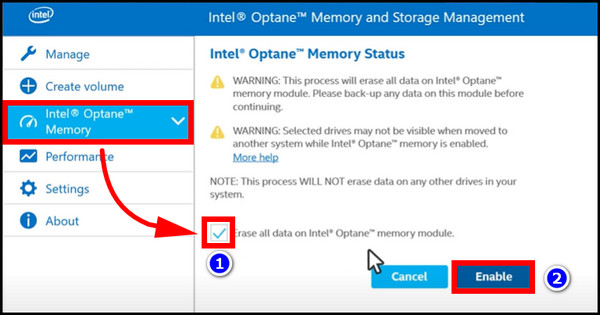
Now, lets go through the steps to set an SSD cache using Intel Optane.
You will not feel the snappiness of opening applications instantly.
As you restart the computer and continue using different applications, they are copied to the SSD cache.
Quickly check out our epic guide on how tomove games HDD to SSD.
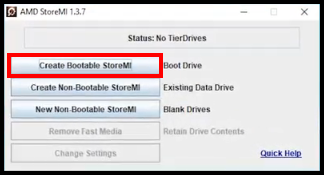
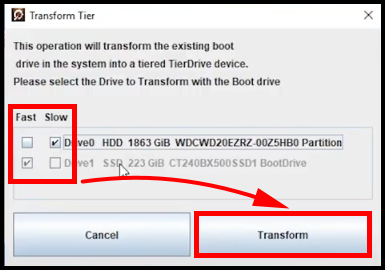
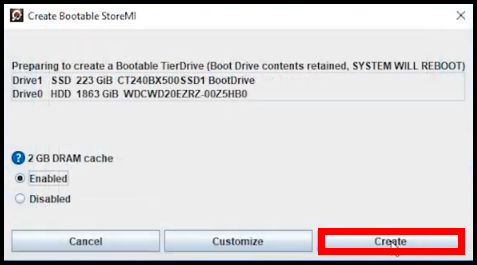
For AMD Systems
The StoreMI app is not available for every AMD processor.
It only works on theRyzenplatform with a handful of pre-selected motherboard chipsets.
If you are on older architecture, lets say Bulldozer, the official app will not support it.
To do this, navigate toIntegrated Peripherals>OnChip SATA punch in>AHCI.
reboot your system to see the changes taking place.
This section will shed light on this.
I have used an AMD Ryzen setup to test the SSD caching.
The results will be very similar to an Intel system, so I have not focused on that part.
As on the test bench, I have used a Ryzen 5 2600x processor with an AMD X470 motherboard.
Two sticks of 8 RAM on a dual-channel configuration are also present.
For the GPU, we have an RTX 2060 on board.
And we have Samsung 860 EVO SSD along with a WD 2 TB drive on the storage front.
On to some benchmarks, then.
I have CS: GO, GTA5, and PUBG to test out the loading times of the games.
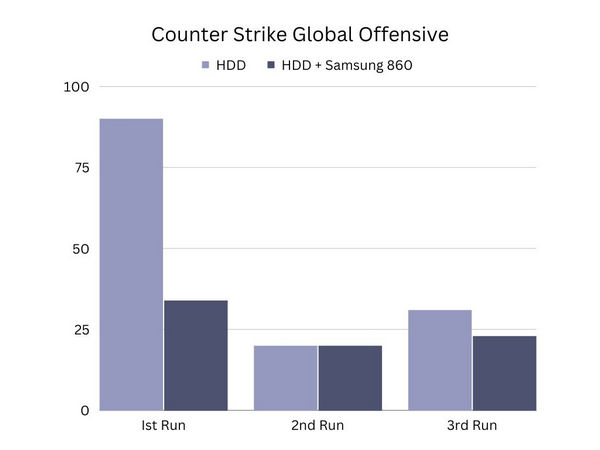
First up is Counter Strike Global Offensive.
With the HDD, the loading time decreases dramatically with the second boot.
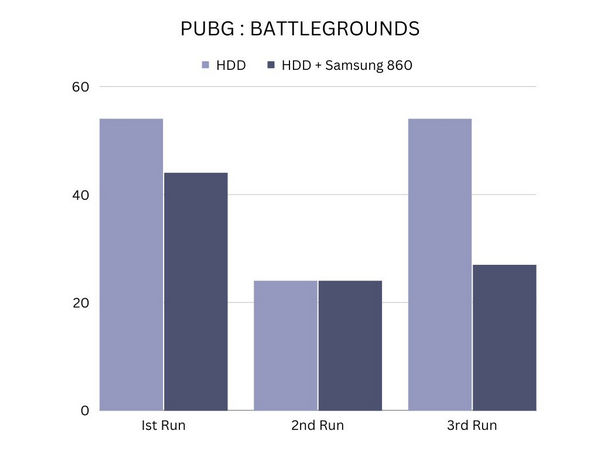
Next on the list is PUBG.
With PUBG, loading it for the first time takes longer with both the HDD and the SSD cache.
However, during subsequent runs, loading times are decreased with SSD caching while the HDD takes a hit.
And we see improved performance when loading the game after restarting the computer.
The last on the game list is GTA 5.
This also has to do with the game being an enormous 120 GB in size.
So, you are not really benefitting unless you use a huge SSD purely for caching.
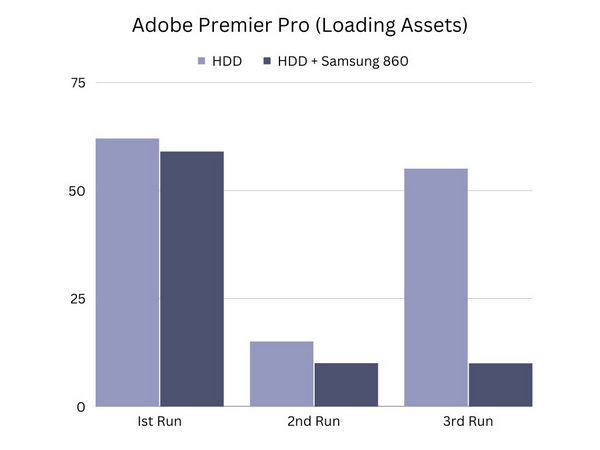
Now onto some system benchmarks.
With Premier Pro, we do see a massive increase in loading times on subsequent reboots.
The SSD caching really seems to be working here.
So what conclusions can we really draw from the results?
The performance gains are substantial for applications that you use often.
And if the applications are smaller, you get fewer loading times, as we saw with GTA 5.
The SSD cache really shines when the app learns your usage patterns and copies that data on the SSD.
Now, should you use an SSD cache?
Not really, at this point.
And that will always be faster than an SSD cache.
For older systems, even a cheaper 120 GB SSD can provide a nice speed boost.
you’re free to try this out if you have spare flash storage lying around.
Until next time its goodbye.
